Sunday, October 30, 2011
Notes from the machine room
I have realized that many links on the blog were broken. I hope I have managed to fix all of them now.
Monday, September 12, 2011
MiG-15 details
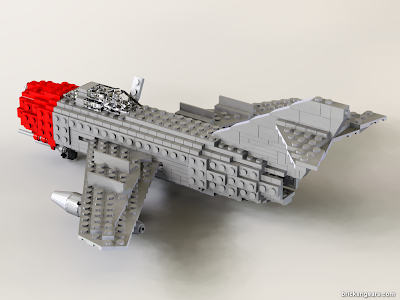
There is a new rendering in the MiG-15 album that shows how the wing is attached to the body:

This render shows the internals of the body, with the outer shell removed. The bricks that are not normally visible are in blue.
The real MiG-15 has a sweep angle of 35 degrees. I approximated that with the typical LEGO Pythagoras layout at 3-4-5 stud offsets. This gives an angle of atan(3/4) = 36.8 degrees.
You can see the triangle at the wing root (large yellow). The studs marked with yellow circles are attached to the body, from the bottom and from the top as well. Even so the structure is far from rigid.
The wing-fences are attached similarly, but the triangle is half the size, at 1.5, 2 and 2.5 stud offsets.
Thursday, June 23, 2011
Silver MiG
I have two piece of news.
First of all, we have the results of the LegoMilitary Build Competition. And I got second prize in the "Warsaw Pact Aircraft" category! I am very happy, I never managed to achieve anything like that in a competition. Mad Physicist was the judge and it was quite competitive... The other finalists are quite impressive too. The An-225 is quite a beast even at 1:100 scale. The Su-9 from John Lamarck is also very nice, for example it has a retractable landing gear. I am proud to be a member of the club.
The second thing is, that of course I was quite curious whether the bricks I have put together on the screen can be actually built together in real life. Executive summary: they can.

In fact the wing was the only place that needed some redesign because the original was incredibly weak. The contour is the same but now it is a little bit stronger. It is not quite like a rock yet, but I am not afraid to hold it in my hands any more. The body is actually quite rigid, it is easy to hold there.
The plane itself is surprisingly heavy. The body consists of many small plates and its interior is quite packed too so that it holds the airplane together. The landing gear is very weak, it can hardly support the vast weight. This can be seen on the photos too. I am still thinking of another design but so far I did not find anything satisfactory.

Also, the rear is quite heavy so I had to put in some extra weight to keep the balance at the front. Inside the plane there are two metal screws that prevent it from "sitting down".
One more thing, the aft of the cabin roof. This is made of a transparent 2x3 slope brick. The last time such a brick was manufactured was in the seventies. I managed to get one, but it is a bit yellowish.

I am happy to have the real plane after all. I have uploaded many photos to the album and of course to Flickr too. One more extra: for hardcore readers I have uploaded the LXF file to this page so that you can try it on Lego Digital Designer.
First of all, we have the results of the LegoMilitary Build Competition. And I got second prize in the "Warsaw Pact Aircraft" category! I am very happy, I never managed to achieve anything like that in a competition. Mad Physicist was the judge and it was quite competitive... The other finalists are quite impressive too. The An-225 is quite a beast even at 1:100 scale. The Su-9 from John Lamarck is also very nice, for example it has a retractable landing gear. I am proud to be a member of the club.
The second thing is, that of course I was quite curious whether the bricks I have put together on the screen can be actually built together in real life. Executive summary: they can.
In fact the wing was the only place that needed some redesign because the original was incredibly weak. The contour is the same but now it is a little bit stronger. It is not quite like a rock yet, but I am not afraid to hold it in my hands any more. The body is actually quite rigid, it is easy to hold there.
The plane itself is surprisingly heavy. The body consists of many small plates and its interior is quite packed too so that it holds the airplane together. The landing gear is very weak, it can hardly support the vast weight. This can be seen on the photos too. I am still thinking of another design but so far I did not find anything satisfactory.
Also, the rear is quite heavy so I had to put in some extra weight to keep the balance at the front. Inside the plane there are two metal screws that prevent it from "sitting down".
One more thing, the aft of the cabin roof. This is made of a transparent 2x3 slope brick. The last time such a brick was manufactured was in the seventies. I managed to get one, but it is a bit yellowish.
I am happy to have the real plane after all. I have uploaded many photos to the album and of course to Flickr too. One more extra: for hardcore readers I have uploaded the LXF file to this page so that you can try it on Lego Digital Designer.
Sunday, May 15, 2011
MiG-15
Around Easter I have managed to have some rest and even more importantly, away from my other hobbies. As this year's Lego Military Build Competition is currently running I thought I could give it a try.
As I am a big fan of flying things I have tried the "Soviet Cold War Aircraft" category. I chose a MiG-15 as not many LEGO versions exist. The type has served in almost all Warsaw Pact countries including the Hungarian Air Force. Amongst all Soviet types probably this had the most advantage over its Western counterparts. (Does anyone remember Chuck Yeager's Air Combat?)
Brainstorming has started with the cigar-shaped body. It has a circular cross section with the diameter continuously changing from the front towards the aft. To make it more complicated, the shell gets thin towards the front an the end. The original inspiration was given by the sphere from legohaulic: it seemed that it may be possible to build the cigar from plates, with studs pointing outside.

This is the end result. I tried to build it in the smallest size possible, this corresponds to 1:35 scale approximately. The small size meant some compromises. For example the landing gear is not retractable into the body and the wings.
The model was built with Lego Digital Designerrel in Universe mode). The images were rendered with MegaPOV using Koyan's tutorial. But I already have the bricks underway, I am quite curious if I manage to build it like it is shown on these images.
Until this happens there are more images in the album. Because of the competition I have uploaded the images to Flickr as well.
The competition deadline is May 31st 2011, I am sure we will see lots of great entries.
 |
| The announcement of the competition |
 |
| A Hungarian MiG-15 from the Museum of Hungarian Aviation in Szolnok |
This is the end result. I tried to build it in the smallest size possible, this corresponds to 1:35 scale approximately. The small size meant some compromises. For example the landing gear is not retractable into the body and the wings.
The model was built with Lego Digital Designerrel in Universe mode). The images were rendered with MegaPOV using Koyan's tutorial. But I already have the bricks underway, I am quite curious if I manage to build it like it is shown on these images.
Until this happens there are more images in the album. Because of the competition I have uploaded the images to Flickr as well.
The competition deadline is May 31st 2011, I am sure we will see lots of great entries.
Sunday, January 9, 2011
New year, new set: 8853 Excavator
And 2011 begun, so Happy New Year. But let's go on to something interesting: today we take a look at an excavator from 1988, more specifically a front loader. I have to admit that even though I was a big Technic fan around that time, I could easily walk past this set. If I deep dive into my memories, I cannot really find anything even though Technicopedia thinks that this set has really existed..

But now I had a chance to learn it much better. I was in a second hand toy fair when I found it for a bit more than 10 USD. I have quickly realized that it has most important parts and all of them are in a good shape, despite coming from the most fragile era of Technic history with toothed connectors and toothed Technic plates. So I decided to grab it.
Datasheet:


More images in the gallery as usual. If you would like to understand how the mechanisms work the Technicopedia article is very detailed.
But now I had a chance to learn it much better. I was in a second hand toy fair when I found it for a bit more than 10 USD. I have quickly realized that it has most important parts and all of them are in a good shape, despite coming from the most fragile era of Technic history with toothed connectors and toothed Technic plates. So I decided to grab it.
Datasheet:
- Number: 8853
- Theme: Technic, construction
- Year introduced: 1988
- Parts: 332 (Peeron)
- Price: from 30 USD (Bricklink)
Let's take a look at the set. There are no pistons and there is no engine. (Maybe this is why I did not really pay attention around that time). But there is lots of mechanics that can be operated in various ways. The light on the top can steer the rear wheels, like on any normal excavator.


But the really big thing is the bucket operation mechanism that can be moved using the two large steering wheels on the rear. The rearmost wheel lifts the whole bucket mechanism and the bucket while the other one dumps the content of the bucket. It operates with a fairly complicated mechanism with gears and all sorts of arms. The interesting thing is that the two wheels move the bucket independently: the bucket will stay at the same angle unless we operate the dumping wheel.
You have to as really careful with the operation though. The mechanism contains many fragile parts and it clearly feels that if there is any tension in will break very easily (like my own similar aged other sets).
All in all, I think it is a fairly good set. It contains interesting functions and can be played well. For this amount of money I certainly think it was a good buy.
More images in the gallery as usual. If you would like to understand how the mechanisms work the Technicopedia article is very detailed.
Subscribe to:
Posts (Atom)